Date of Draft: 2020/07/30
Author: Mark T of D&S
Last Update: Daniel Sui of D&S | 2021/03/17
On the Hyper-V, using either New Edge or Internet Explorer, open an 'In Private' browsing Window
NOTE: MS has a history of making some of its admin portal functionality not work entirely, unless accessed with an MS browser
Log into the client's Office 365 Exchange admin portal
->Office 365 Admin portal: https://outlook.office365.com/ecp
->username: admin@[client_domain].onmicrosoft.com
->password: xxxxxxxxxx
Click on the 9-dot icon (3 dots x 3 dots) in the top-left corner of the browser page
->click 'Admin' from the list of available apps
-->click 'Groups' in the left column
--->click 'Shared mailboxes' in the left column
Open a 2nd tab in the 'In Private' browsing window
->type "https://outlook.office365.com/ecp" in the new tab
-->select 'recipients' from the left column
NOTE: This will enable you to alternate between converting user mailboxes into shared mailboxes in the 'Exchange admin center' browser tab, and then setting properties for the newly converted shared mailboxes in the 'Microsoft 365 admin center' browser tab.
Install VEEAM Office 365 Backup on the main file server
=======================================================
NOTE: it's okay if this happens to be the primary domain controller
Download from:
https://download2.veeam.com/VBO/v5/VeeamBackupOffice365_5.0.2.22.zip
https://download2.veeam.com/VBO/v5/GA/VeeamBackupOffice365_5.0.1.179.zip
https://download5.veeam.com/VeeamBackupOffice365_4.0.1.531.zip
->extract the downloaded zip into a subfolder of the 'Downloads' directory
From an admin command prompt, install each of the extracted MSI's in this order:
msiexec /I C:\Users\Administrator\Downloads\VeeamBackupOffice365_4.0.1.531\Veeam.Backup365_4.0.1.531.msi
msiexec /I C:\Users\Administrator\Downloads\VeeamBackupOffice365_4.0.1.531\VeeamExplorerForExchange_4.0.1.519.msi
msiexec /I C:\Users\Administrator\Downloads\VeeamBackupOffice365_4.0.1.531\VeeamExplorerForSharePoint_4.0.1.519.msi
...agree and accept all defaults
Create a local data location for the VEEAM backups:
->D:\DATA\O365-Company_Name...with no spaces
Exclude this specific local data folder from the Azure backups
On the desktop, there will be two new 'Veeam' shortcuts: a Powershell shortcut, and this one:
Run "Veeam Backup for Microsoft Office 365 connect to..."
->Go to 'General options'
-->'Notifications'
--->'SMTP server' set to '[CompanyName-com].mail.protection.outlook.com' (as appropriate)
---->'Advanced' and set the port to 25 with no encryption or authentication
--->'From' set to VEEAM@[CompanyName].com
--->'To' set to [CompanyName]@helpdesk.dsinfinite.solutions
--->uncheck 'Notify on success'
--->click 'Apply'
--->send a test message and confirm success and receipt at the helpdesk
NOTE: a properly configured DNS SPF TXT-record is required for Office 365 to accept the test message. HOWEVER, the email will not be relayed to a non-Office 365 domain mailbox if an Exchange 'Receive Connector' has not been pre-configured to allow Office 365 to relay email to other domains.
-->'Folders'
--->uncheck 'Junk E-Mail'
--->click 'Apply'
Login to the Office 365 Exchange Admin Portal.
Go to Permissions, then under Admin Roles click the '+' symbol to add a new role and enter the Name and Description 'CloudMigratorImpersonation'.
Click the '+' symbol under 'Roles:', select ApplicationImpersonation, click 'add →' then 'OK'
Click the '+' symbol under 'Members:' and select your Admin User, click 'add →' then 'OK'
Click 'Save' in the 'Role Group' window and you will then see the Impersonation role listed in Admin Roles. You can now use application impersonation with your admin user in CloudMigrator.
*Use new Exchange Admin Panel if you have issues*
->From the 'Home' tab, click 'Add Org'
Basic Auth:
-->Next, Next, 'Basic Authentication', Next
-->enter the Office 365 admin credentials, Next..."verifying connection and organization parameters" will take awhile, Finish
Modern Auth: https://helpdesk.dsinfinite.solutions/downloads/files/1
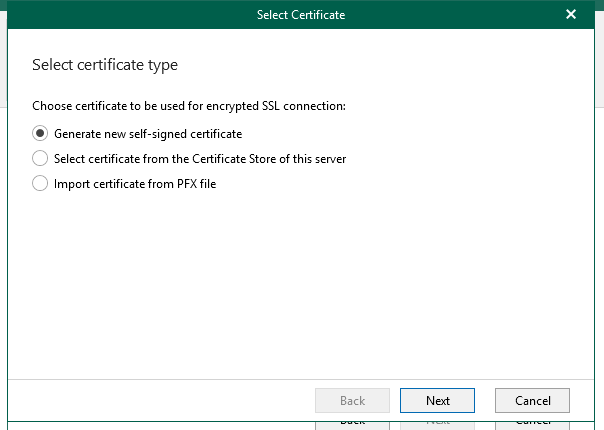
New Modern Auth:
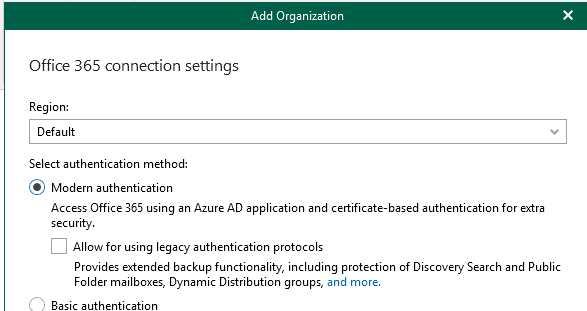
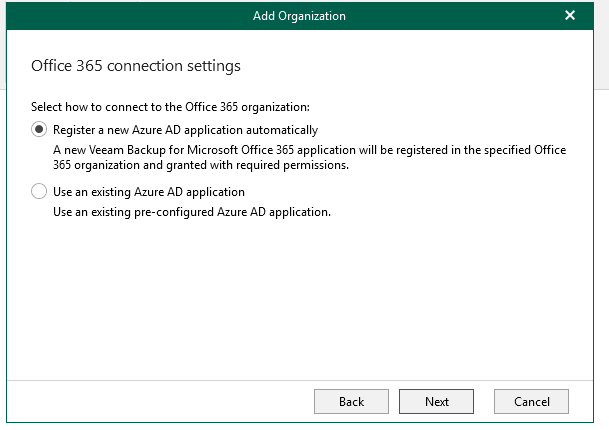
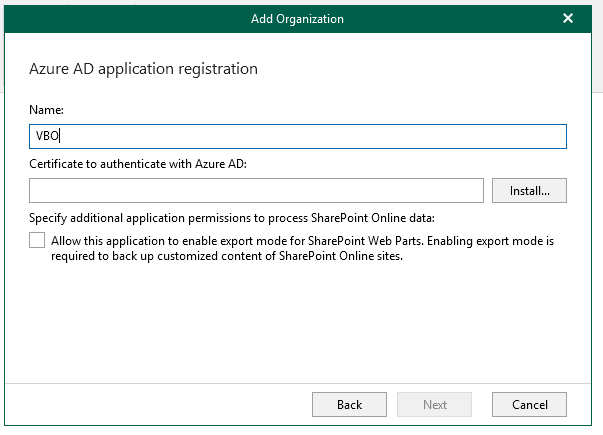
Select Install
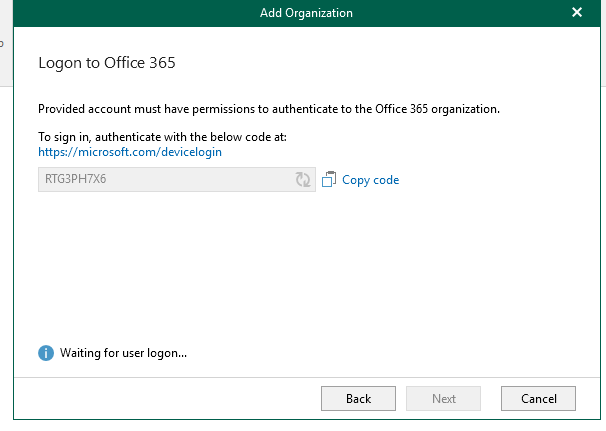
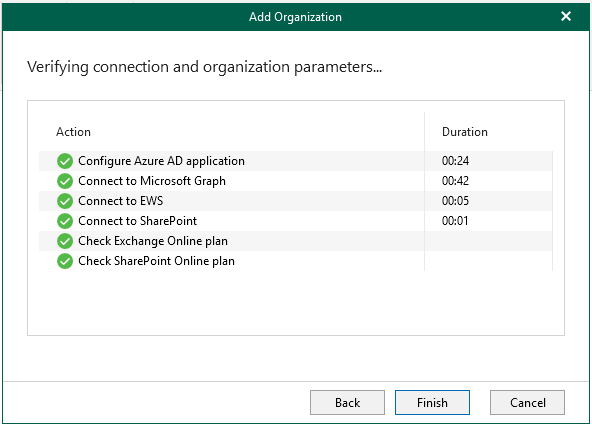
->click 'BACKUP INFRASTRUCTURE'
-->click on 'Backup Repositories' in the left column
--->'Add repository'
---->'Name' is "[Company Name]", Next
---->'Path' (navigate to the local VEEAM data folder created in the beginning), Next, Next
---->Change retention policy settings to 'Snapshot-based retention', Finish
--->Remove 'Default Backup Repository'
->Select 'ORGANIZATIONS' from the left column
-->select 'Backup Jobs' from the ribbon bar to create a new backup job
--->'Name' is "[Company Name]", Next
--->Change 'Select objects to backup' to "Back up entire organization", Next
--->'Add' to add objects to exclude
---->select admin users (having no mailbox) and any miscellaneous mailboxes, like 'Discovery Search'
----->...and then click the 'Add' button, Next, Next
--->set backup time (1:00am - as long as it doesn't conflict with the scheduled Azure cloud backup)
--->...then click 'Create'
Proceed below if the recipient company has more than 10x User Licenses.
Switch to the 'In Private' browser windows we opened earlier on the Hyper-V - it's time to convert recipients...
Go to the 'Exchange admin center' browser tab and set each mailbox user to Shared, which is a menu option in the right-most column
->upon the success of the conversion, wait a few seconds then click the refresh icon above the 'DISPLAY NAME' column
-> repeat the refresh every few seconds until the converted user's name disappears from the list
Go to the 'Microsoft 365 admin center' browser tab
->Select 'Groups'
-->'Shared Maiboxes'
--->click the 'Refresh' link at the top of the 'Name' column
--->select the newly converted shared mailbox
---->select 'Edit' from below 'Sent items' in the right-most column
----->Turn on 'Copy items sent as this mailbox'
----->Turn on 'Copy items sent on behalf of this mailbox', Save, Close
...and repeat for all recipient mailboxes, except for any admin user mailbox
To complete this job, go back to the open VEEAM application window on the file server and run the scheduled backup job.
Setup Veeam status through Pandora
Comments (1)
Read