OFFICE365 MIGRATION
Author: Daniel Sui, D&S InfinITe Solutions
Reason: In this article we will use the domain X WEST CARRIERS to sync Active Directory with Microsoft Cloud, provides the ability to use Office365 as the mail server. In this process we will move from current email provider and Office version to Office365.
Pre-requisites:
Azure AD Connect installed on the Domain Controller
Ability to modify host records (ENOM)
Administrator credentials to Office365
Things we know:
Domain name is XWEST.local
New mail is being hosted by Office365
Mail is being hosted by Rogers
Our Office365 host email is "@xwestcarriers.com"
Troubleshooting resources used:
https://docs.microsoft.com/en-us/azure/active-directory/hybrid/how-to-connect-sso-quick-start
Step 1: Configure autodiscover host records
If the domain is being hosted by ENOM continue with the following:
1. Login to ENOM and click on My Domains
2. Locate the domain name, in this case XWESTCARRIERS.COM
3. Edit the Host Records, refer to the following screenshot below. Include the boxes that are checked and the text that is highlighted. All other data is dependent on the client and does not reflect the same for every client.

Step 2: Verify CNAME Records in the Office365 admin portal
1. Login to Office365 with the administrator account
2. Open up the Microsoft 365 admin center
3. On the left hand panel, click on Setup -> Domains
4. Select the domain name in which the status is "Setup in progress"
5. Click on "Continue setup"

6. Ensure "I'll manage my own DNS records" is checked and hit Next
7. Ensure "Exchange" is checked and hit Next.
8. Scrolling down to the bottom you will see "Verify". If configured properly, upon running this the page will refresh. For a successful verify you will see the CNAME records with a green checkmark.

Step 3: Verify with Azure AD Connect
1. Open PowerShell and run the following command "Set-ExecutionPolicy Unrestricted"
2. Open Azure AD Connect as Administrator
3. Use Custom Settings for install and select "Password Synchronization" and "Enable single sign on"
Continue through the wizard until you get to the Enable single sign on page. Provide domain administrator credentials
After completion of the wizard, follow these instructions to verify that you have enabled Seamless SSO correctly:
- Sign in to the Azure Active Directory administrative center with the global administrator credentials for your tenant.
- Select Azure Active Directory in the left pane.
- Select Azure AD Connect.
- Verify that the Seamless single sign-on feature appears as Enabled.
If Sync Status is not ENABLED you may have to synchronize the Azure AD. Open the program "Synchronization Service Manager" and under "Actions" click on "Run"
Logout of Azure Active Directory administrative center and relogin and verify
Important
Seamless SSO creates a computer account named AZUREADSSOACC (which represents Azure AD) in your on-premises Active Directory (AD) in each AD forest. This computer account is needed for the feature to work. If you are using Pass-the-Hash and Credential Theft Mitigation architectures in your on-premises environment, ensure that the AZUREADSSOACC computer account doesn't end up in the Quarantine container. Make the appropriate changes to create the computer account in the Computers container. After Seamless SSO is successfully enabled on the Azure AD Connect wizard, move the AZUREADSSOACC computer account to an Organization Unit (OU) where other computer accounts are managed to ensure that it is not deleted inadvertently.
Step 4: Roll out the feature
You start by adding the following Azure AD URL to all or selected users' Intranet zone settings by using Group Policy in Active Directory:
https://autologon.microsoftazuread-sso.com
In addition, you need to enable an Intranet zone policy setting called Allow updates to status bar via script through Group Policy.
Note
The following instructions work only for Internet Explorer and Google Chrome on Windows (if it shares a set of trusted site URLs with Internet Explorer). Read the next section for instructions on how to set up Mozilla Firefox and Google Chrome on macOS.
Why do you need to modify users' Intranet zone settings?
By default, the browser automatically calculates the correct zone, either Internet or Intranet, from a specific URL. For example, http://contoso/ maps to the Intranet zone, whereas http://intranet.contoso.com/ maps to the Internet zone (because the URL contains a period). Browsers will not send Kerberos tickets to a cloud endpoint, like the Azure AD URL, unless you explicitly add the URL to the browser's Intranet zone.
There are two ways to modify users' Intranet zone settings:
| Option | Admin consideration | User experience |
|---|---|---|
| Group policy | Admin locks down editing of Intranet zone settings | Users cannot modify their own settings |
| Group policy preference | Admin allows editing on Intranet zone settings | Users can modify their own settings |
"Group policy preference" option - Detailed steps
- Open the Group Policy Management Editor tool.
- Edit the group policy that's applied to some or all your users. This example uses Default Domain Policy.
- Browse to User Configuration > Preferences > Windows Settings > Registry > New > Registry item.
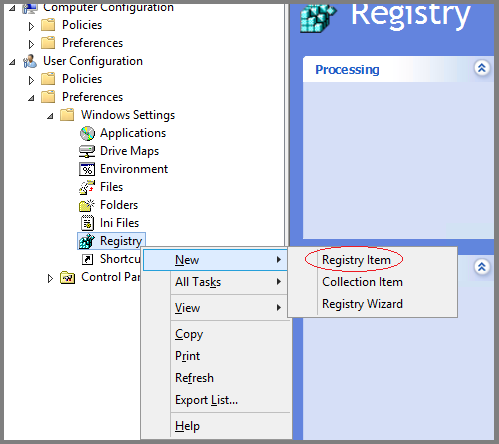
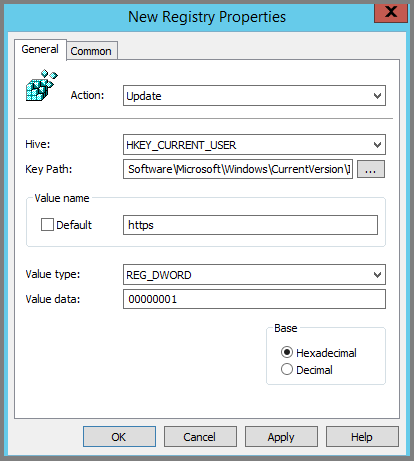
- Enter the following values in appropriate fields and click OK.
- Key Path: Software\Microsoft\Windows\CurrentVersion\Internet Settings\ZoneMap\Domains\microsoftazuread-sso.com\autologon
- Value name: https.
- Value type: REG_DWORD.
Value data: 00000001.

Browse to User Configuration > Administrative Templates > Windows Components > Internet Explorer > Internet Control Panel > Security Page > Intranet Zone. Then select Allow updates to status bar via script.
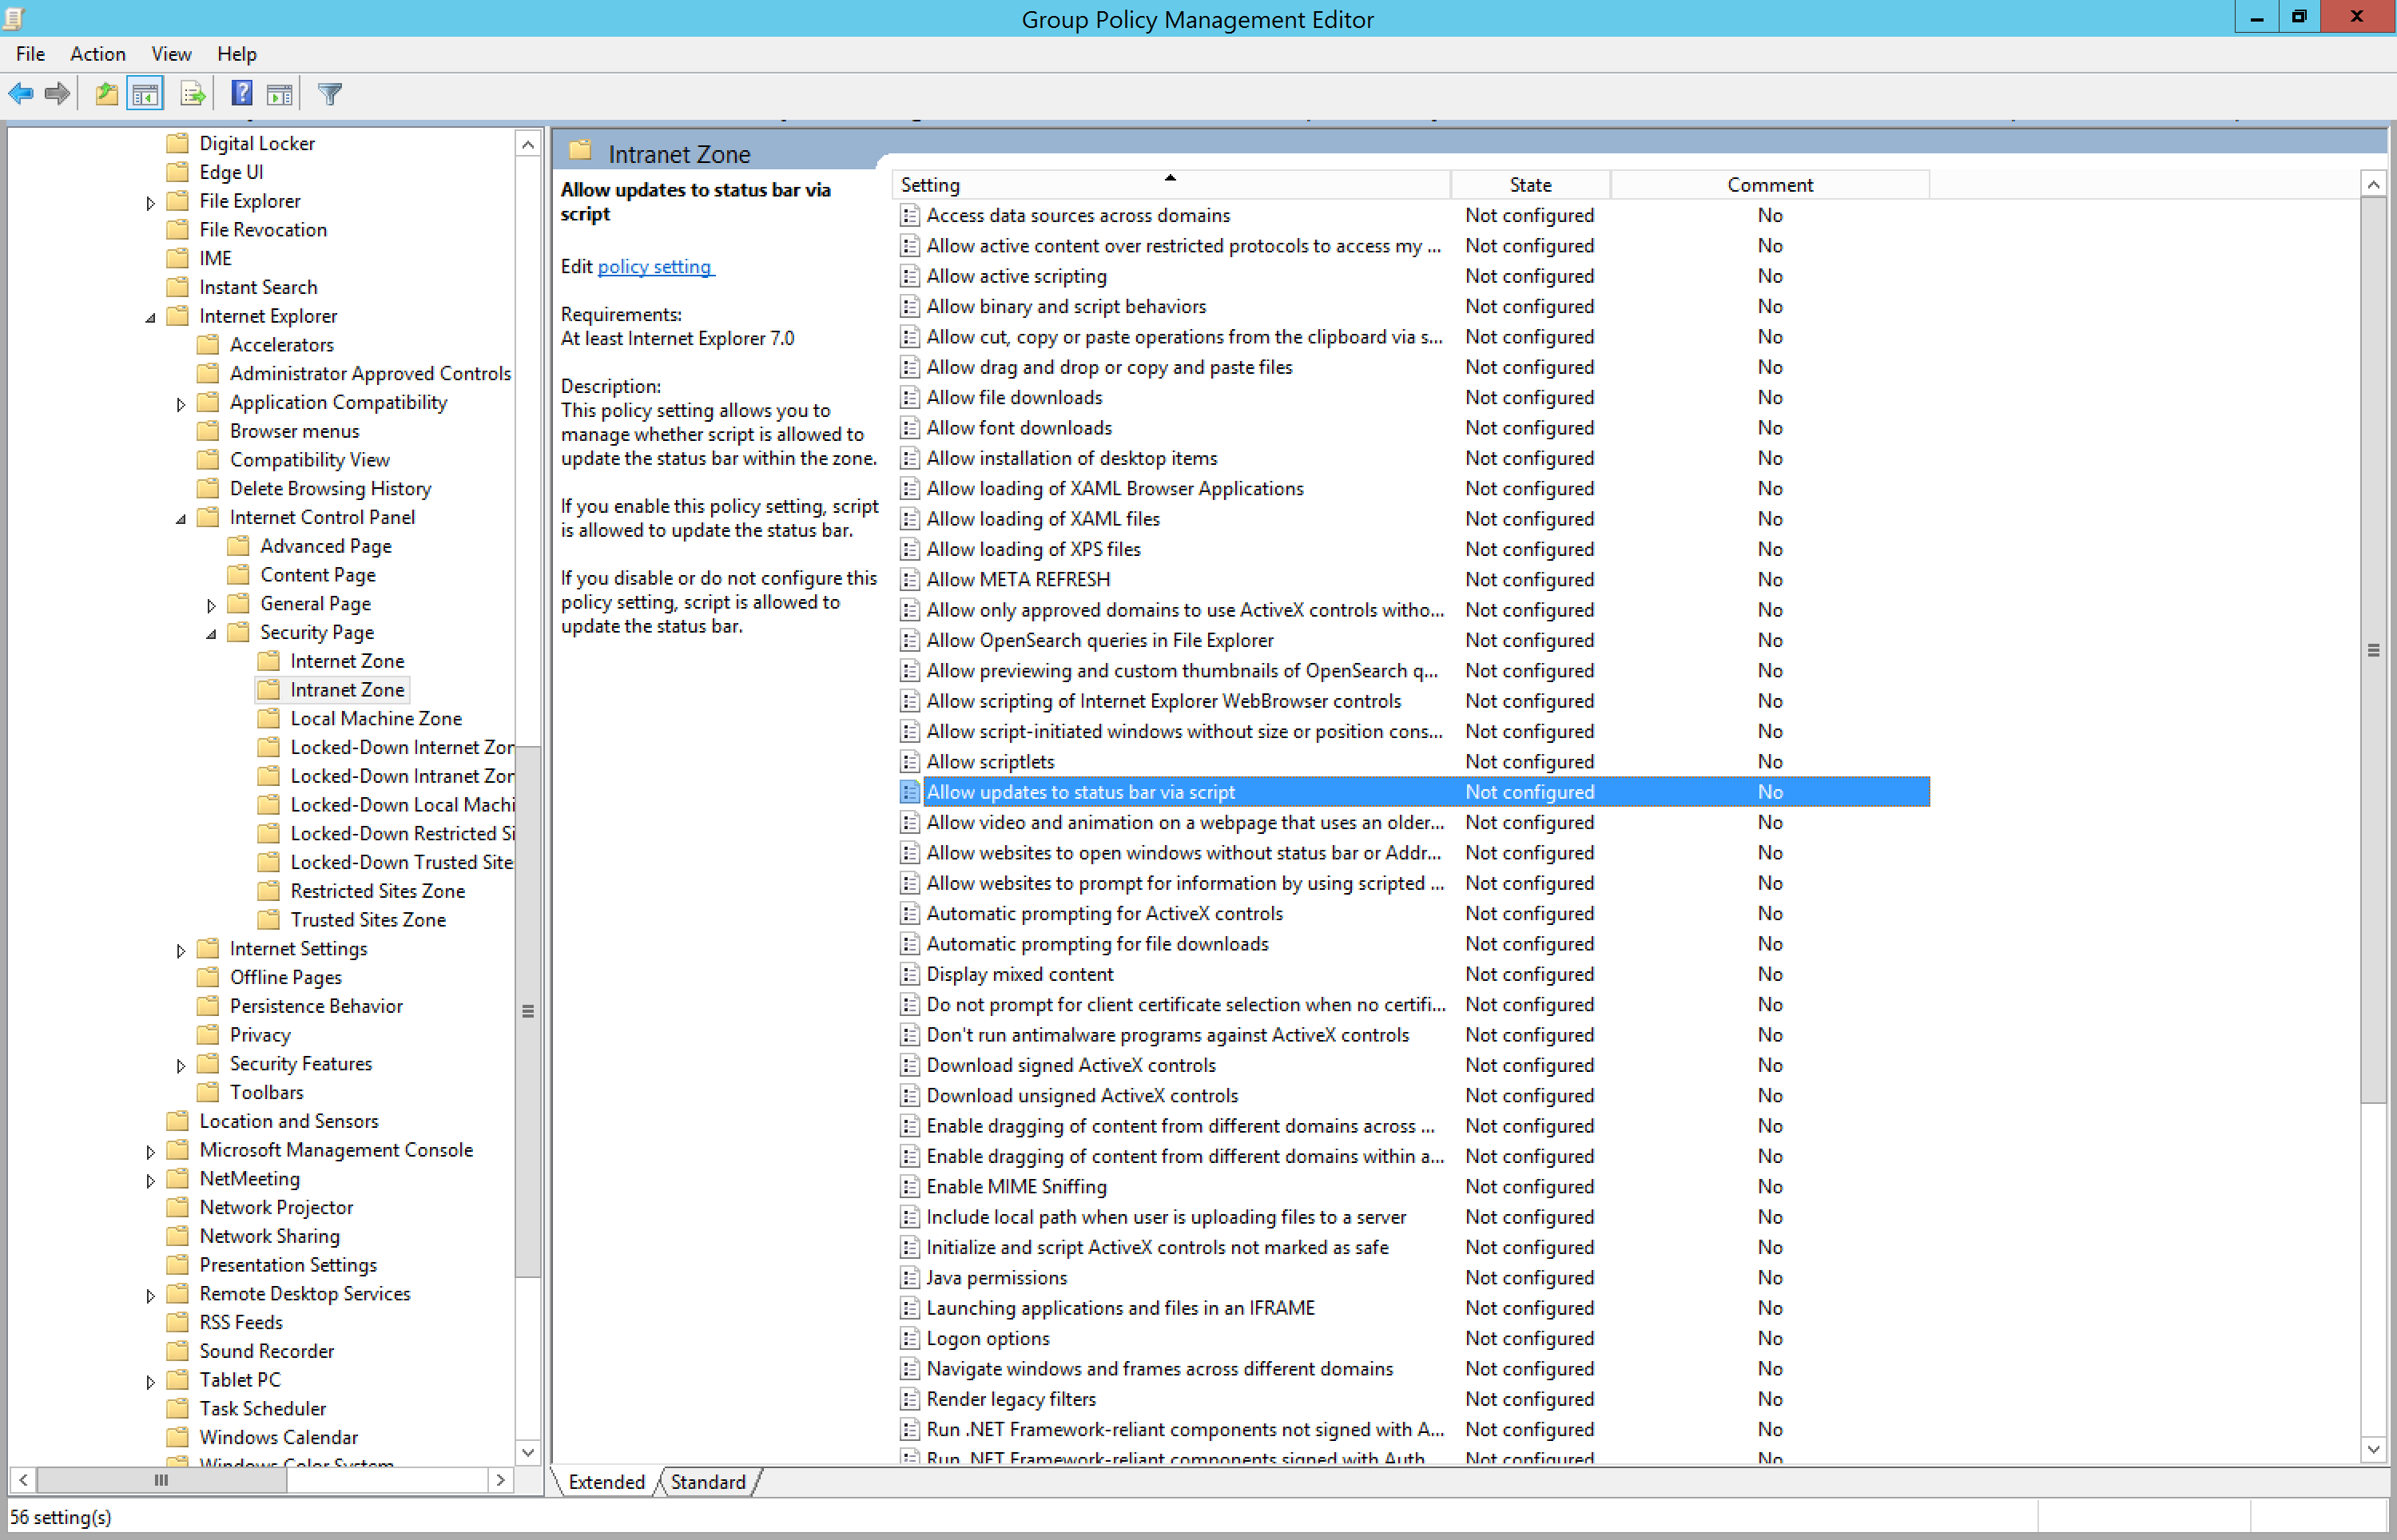
Enable the policy setting, and then select OK.
Step 5: Add the new UPN suffix
On the server that Active Directory Domain Services (AD DS) runs on, in the Server Manager choose Tools > Active Directory Domains and Trusts.
Or, if you don't have Windows Server 2012
Press Windows key + R to open the Run dialog, and then type in Domain.msc, and then choose OK.
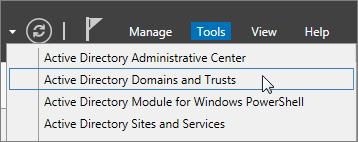
On the Active Directory Domains and Trusts window, right-click Active Directory Domains and Trusts, and then choose Properties.
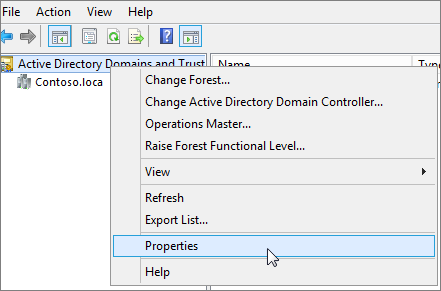
2. On the UPN Suffixes tab, in the Alternative UPN Suffixes box, type your new UPN suffix or suffixes, and then choose Add > Apply.

Choose OK when you're done adding suffixes.
Step 5: Change the UPN suffix for existing users
1. On the server that Active Directory Domain Services (AD DS) runs on, in the Server Manager choose Tools > Active Directory Active Directory Users and Computers.
Or, if you don't have Windows Server 2012
Press Windows key + R to open the Run dialog, and then type in Dsa.msc, and then click OK
2. Select a user, right-click, and then choose Properties.
3. On the Account tab, in the UPN suffix drop-down list, choose the new UPN suffix, and then choose OK.
4. Complete these steps for every user.
Step 6: ONLY APPLICABLE TO CLIENTS WITH ROGERS HOSTING
If not applicable, skip to step 6.
1. Login to https://hosting.rogershosting.com/portal/
2. Go to "EasyMail Setup"

3. In the new window, go to "Modify an existing Email Account"
4. Modify an Email Account
5. Select the email account of the user you want to migrate over to Office365 and hit Next
6. In the Quick Properties you will see a box for "Forward mail to". Input the mail address of the user with the .onmicrosoft.com alias
Example: Richard@XWestCarriers.com will be forwarding mail to Richard@XWestCarriersCND.onmicrosoft.com
Step 7: Create mail contacts in Office365
1. Login to Office365 with Administrator credentials
2. Open up the Microsoft 365 admin center (Admin) and select the Exchange Admin center

3. Create mail contacts of everyone internally

Step 8: Migrating the user to Office 365
- Delete the contact of the user in Exchange Admin Center, wait 5 minutes before adding the license to the user’s Office365 account
- Reset Office365 password for the user and document in the database
- Ensure Rogers forwarding is setup to the users @onmicrosoft.com address
- Remote on to the user’s workstation with their credentials
- Take note of the user’s data files
- Uninstall Office and use the Office Uninstaller on the D&S Standards drive under Tools
- Restart the computer
- Login to Office.com with their credentials and download the 32BIT version of Office
- Create a new mail profile and auto discover, when prompted put in their Office365 password you had reset earlier
- Confirm inbound and outbound email is working
- Import all data files you had taken note of earlier
12. Setup cached exchange mode for "ALL"
See the following steps below to ensure auto-complete is functioning as normal
Shut down Outlook
Rename most current auto complete file - add ".old" at end
C:\Users\TrevorL\AppData\Local\Microsoft\Outlook\RoamCache\Stream_Autocomplete_0_3FC5922B143AB0418A4EAC47BD0275E7.dat
Find the newest auto complete file that will be larger than all the rest
Rename the larger file with the name of current one above
Start outlook - test.
Note: During synchronization mail will not flow properly into the Outlook mailbox. To workaround this have the user use OWA until synchronization is complete. To see progress, view the data file properties and see the server data size versus the data file size.
Comments (0)